使用UpTimeFlare搭建属于你自己的状态监控吧!
项目地址:https://github.com/lyc8503/UptimeFlare
项目介绍
类似于UpTimeRobot,这个项目允许你使用Cloudflare和Github搭建一个属于你自己的状态监控页面。下面是作者给出的效果展示图:

搭建教程
材料准备
一个活人(都有的吧qwq)
一台可以进行操作的设备(推荐Windows、MacOS和Linux Desktop)
一个Github账户(没用的去https://github.com注册)
一个Cloudflare账户(没有的去https://www.cloudflare.com注册)
一个域名(可选,建议托管在Cloudflare)
前期准备
首先我们先复制一份这个项目仓库,点击项目页面右上角的Use this template然后点击Create a new repository(不建议直接Fork,建议作为私有仓库使用)。然后在创建仓库页面设置一个仓库名,比如就叫UpTimeFlare,将Public改为Private,然后点击Create repository,于是就完成了最简单的第一步。这一步比较简单,就不给出操作截图了。
随后我们需要一个Cloudflare账户,注册的过程就跳过了。登录好了之后访问Cloudflare API Token申请页面创建一个令牌,点击使用模板中的编辑Cloudflare Workers,点击。

接着如下图,就修改这两个参数,然后点击继续以显示摘要,然后点击创建令牌。

然后点击Copy复制API令牌,下面的步骤里要用。

接着我们回到我们刚刚复制的那个仓库,依次点击Settings - Secrets and variables - Actions,点击New repository secrets创建一个新的密钥,Name设置为CLOUDFLARE_API_TOKEN,Secret就设置成你刚刚复制的API令牌。

修改配置
然后我们就要开始设置状态监控了。回到仓库的Code界面,全程我们只需要修改一个配置文件,就是uptime.config.ts,我们点击这个文件,点击右上角的笔Edit this file,起初的配置文件是完整版本的,有些功能我们不需要,可以删除,比如下面这个(位于配置文件的第61到74行):
  notification: {
    // [Optional] apprise API server URL
    // if not specified, no notification will be sent
    appriseApiServer: "<https://apprise.example.com/notify>",
    // [Optional] recipient URL for apprise, refer to <https://github.com/caronc/apprise>
    // if not specified, no notification will be sent
    recipientUrl: "tgram://bottoken/ChatID",
    // [Optional] timezone used in notification messages, default to "Etc/GMT"
    timeZone: "Asia/Shanghai",
    // [Optional] grace period in minutes before sending a notification
    // notification will be sent only if the monitor is down for N continuous checks after the initial failure
    // if not specified, notification will be sent immediately
    gracePeriod: 5,
},如果没有需要我们可以直接删掉,如果需要可以参照原仓库中的Wiki进行配置,为了节省时间,我把一个精简版本的配置文件放在下面,可以删掉原来的所有内容,复制一下我的,然后自行调试:
const pageConfig = {
  // 状态页面的标题,类似于HTML里面的<title></title>
  title: "凌云服务状态",
  // 状态页面右上角的按钮,按顺序从左往右在页面上排列
  links: [
	  // 这个是普通按钮
	  { link: '网址', label: '按钮名称'},
	  // 这个是显示成蓝色按钮的高光按钮
	  { link: '网址', label: '按钮名称', highlight: true },
  ],
}

const workerConfig = {
  // Write KV at most every 3 minutes unless the status changed.
  kvWriteCooldownMinutes: 3,
  // Define all your monitors here
  monitors: [
    // ==========[服务监控]==========
    // 这是一个例子,用于监控一个网页
    // 如果是端口监控,可以参照原作者的Wiki
    {
	    // id必须唯一,使用英文和下划线
      id: 'linyun_blog_monitor',
      // 监控页面展示的监控名称
      name: '凌云·LinYun 博客',
      // 请求形式,HTTP请求一般用GET和POST,分不清就用GET
      method: 'GET',
      // 你监控的网站的地址
      target: '<https://www.linyunlink.top/>',
    },
  ],
  callbacks: {
    onStatusChange: async (
      env: any,
      monitor: any,
      isUp: boolean,
      timeIncidentStart: number,
      timeNow: number,
      reason: string
    ) => {
      // This callback will be called when there's a status change for any monitor
      // Write any Typescript code here

      // This will not follow the grace period settings and will be called immediately when the status changes
      // You need to handle the grace period manually if you want to implement it
    },
    onIncident: async (
      env: any,
      monitor: any,
      timeIncidentStart: number,
      timeNow: number,
      reason: string
    ) => {
      // This callback will be called EVERY 1 MINTUE if there's an on-going incident for any monitor
      // Write any Typescript code here
    },
  },
}

// Don't forget this, otherwise compilation fails.
export { pageConfig, workerConfig }
在上面的代码里,下面的内容可以反复堆叠,达到多个监控的效果,但是id一定要不唯一,以防止冲突,其他的按要求自行调整,每个监控的设置还有更多进阶配置,可以参照作者的Wiki来设置,这里不过多赘述了。
    {
	    // id必须唯一,使用英文和下划线
      id: 'linyun_blog_monitor',
      // 监控页面展示的监控名称
      name: '凌云·LinYun 博客',
      // 请求形式,HTTP请求一般用GET和POST,分不清就用GET
      method: 'GET',
      // 你监控的网站的地址
      target: '<https://www.linyunlink.top/>',
    },
接着我们保存文件,不出意外进入Actions页面,就会发现有一个Action在运行了,随后就会自动部署到Cloudflare上了
访问站点
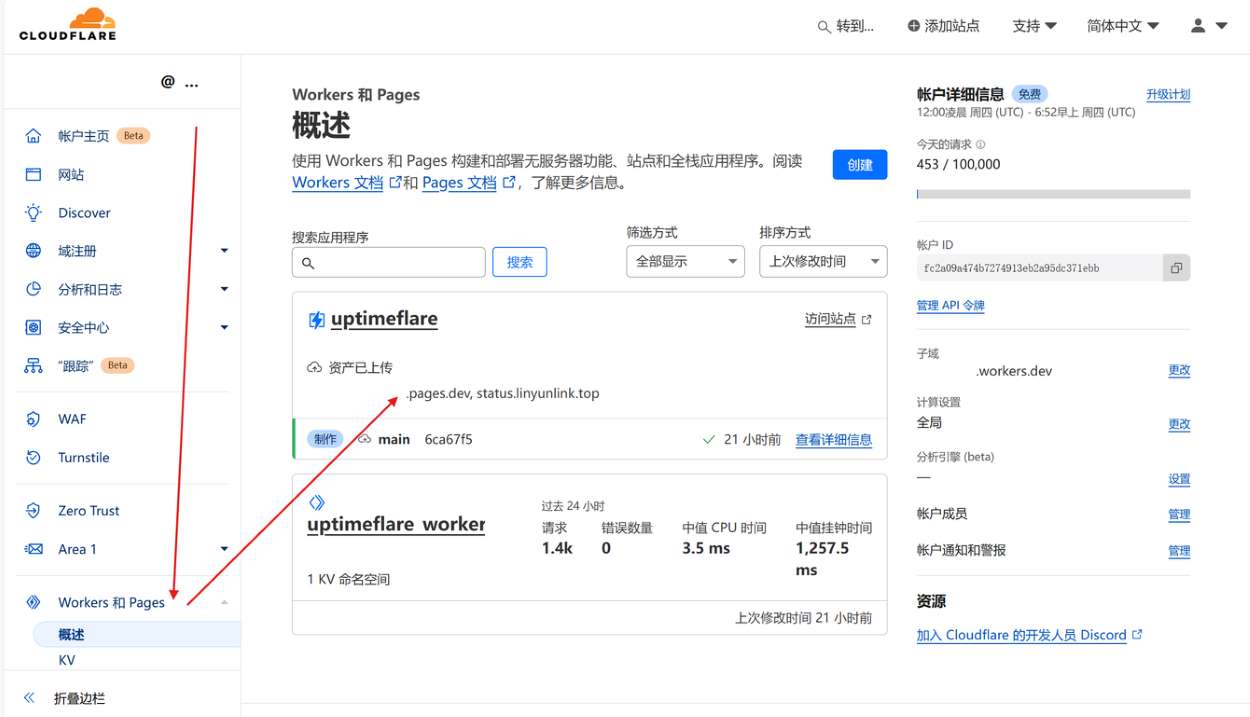
打开Cloudflare Dashboard,点击Wokers 和 Pages,如果你和我一样看到了下面两个项目,祝贺你你已经搭建成功了,点击上面的UpTimeFlare的项目就可以查看访问链接啦!
绑定域名
如果你有一个域名的话,你也可以考虑给你的状态页面绑定一个域名,这个操作也很简单,我们只需要添加一条CNAME记录就好了,但是如果你的域名托管在Cloudflare上,你只需要打开Pages里面的uptimeflare,然后点击自定义域,按照提示操作就完成了!
记录示例(XXXXXXX.pages.dev修改成自己的链接):
写在最后
到此为止,你就完成了所有的搭建过程,感谢你的阅读。如果你有什么问题,欢迎在下面评论,我会给出答复,尽可能帮助你。awa